Timeline
implemented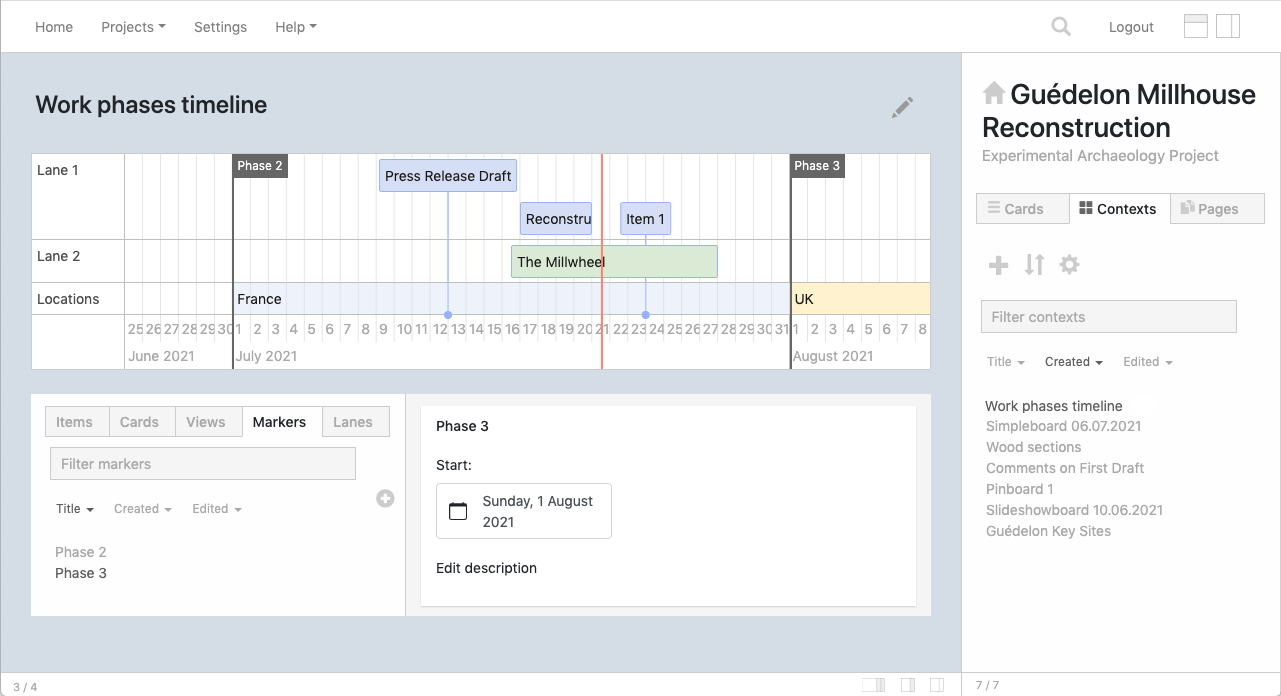
The Timeline context allows users to place cards, events and time periods on an interactive, multilane timeline. It's based on the vis-timeline library, and extends it by adding editable cards with title and body for every item and marker on the timeline, as well as the option to add existing Orsn cards.
- Add cards to a Timeline context and pin them to the timeline at a certain point or time range
- Add new timeline items as points, boxes, ranges, or background regions
- Add markers to the timeline
- Save views of timeline areas
- Create multiple lanes in each timeline for events and time ranges
- Annotate views, markers, and timeline items with labels and descriptions
How to use
- You can create a new item by double-clicking on the timeline.
- It's also possible to create a new item with a start and end point by holding the
cmdkeyboard key (Mac) or thectrlkeyboard key (Win) and dragging a region on the timeline with the mouse. - Once you have clicked on an item to select it, you can drag its start and end points to change them.
- Each item can be displayed as a box, range, point or background. This and the start and end points are editable via the item's card in the preview panel.
- To add an existing card to the timeline, simply drag a card from the cards list in the sidebar onto one of the timeline lanes.
- Alternatively, add the card to the context using the plus sign next to the card in the cards list. Then select the
Cardstab in the timeline context, and click on the card's title to preview it. In the preview panel you will see an option to add the card to the timeline ( icon). - You can add new lanes by clicking on a plus sign in the lanes column. To reorder the lanes, lock the timeline items (see 'Controls' below), then drag and drop the lanes.
- Lanes and timeline items can have their own custom colours. You can set this via the item's preview panel.
- To create a new view, click on the plus icon in the list of views.
- You can create multiple views, then select one of them as the default by clicking on its bookmark icon , in the list of views. When the Timeline context loads, this is the view which will be displayed.
- Each view has its own hyperlink. You can link to the map with that hyperlink and display that particular view when it opens, even if it's not marked as the default view. To copy the link, click on the link icon by the view's title, in the list of views.
Controls
Click on the Timeline context's pencil icon to access its controls.
- Timeline scale. Sets the display of time units on the timeline, from years to milliseconds.
- Timeline steps. Sets the interval of time units on the timeline. For example, if scale is 'years' and steps is 100, the timeline will display a value every hundred years. The default setting is 1.
- Lock items on timeline. When the items are locked, they can't be edited or dragged on the timeline. When items are locked, it is possible to reorder timeline lanes using drag and drop.
Notes
- If you can't edit an item on the timeline, check that items are not locked. See 'Controls' above.